
How to Build a Rain Garden in Your Yard


By Ame Vanorio
Climate change is altering the way rain falls – some places are getting more precipitation and some areas get less. As a result, rain gardens are becoming increasingly popular as a way to deal with shifting water patterns.
Rain gardens collect rainwater from hard surfaces like your roof, driveway, or other areas where water channels, where that excess water can nourish water-loving plants and drain away without wreaking havoc.
A rain garden is designed so that the water is sent into gardens where it waters your plants or is captured in a holding spot where it can percolate out slowly. This keeps the water from going in to storm drains or pooling in low areas and basically wasted.
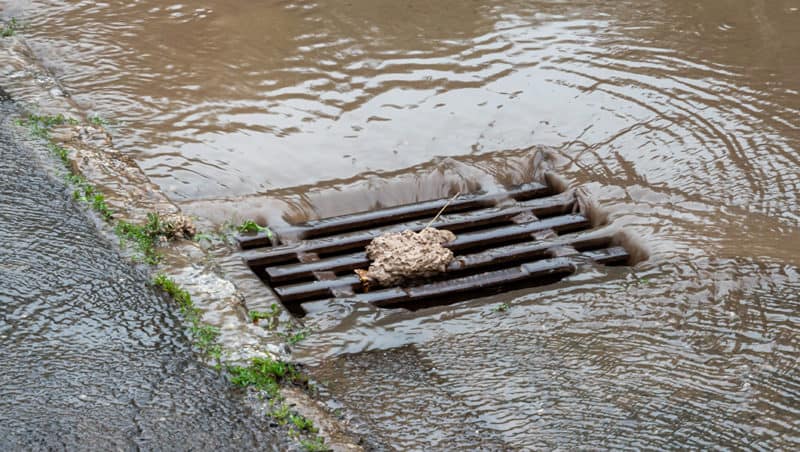
Stormwater causes flooding and can bring pollutants in the city water system and local ponds and streams. It can also flood your basement, wash away landscaping, and create huge puddles in your yard.
It sounds complicated, but you can design and dig a rain garden on your own, or you can hire a landscape designer to help with the excavation and heavy lifting. Then, you can enjoy the massive benefits of having a rain garden.
What is a Rain Garden?
A rain garden is an excavated area that allows water to travel from hard surfaces like rooftops, driveways, roads, and patios to a prepared space. This keeps the water out of the local sewer system or your basement, and at the same time, creates a beautiful addition to your landscape
You can think of a rain garden as essentially a giant garden sponge that soaks up excess rain and filters out pollutants so they don’t end up where you don’t want them.
Rain gardens aren’t ponds. They are only wet for a short period of time after heavy rain. The rest of the time, they’re as dry as the rest of your yard.
Benefits of Rain Gardens
- More water goes into local aquafers
- Protects communities from flooding
- Keeps pollutants such as fertilizers, car oil and asphalt roofing materials out of the water system
- Makes our communities and property more valuable and attractive
- Provides important habitat for wildlife
Planning a Rain Garden
Before you get started, check with your local municipality for rules and regulations regarding your rain garden. Also, check with local utilities before you dig.
Nothing is more empowering than growing a garden and harvesting food in your yard. For more helpful information, check out this guide on how to make a year-round self-sustaining garden.
Location
The next time it rains go outside and observe where the water is going in your yard, down your driveway or even coming from neighboring properties.
What happens to the rain coming out of your gutters. Does it pool along the foundation of your house (not good) or does it flow into the yard?
Do you have an area in your yard where water already pools and is slow to seep into the ground? That is not a good place for a rain garden unless you plan to add some drainage. Remember the purpose of a rain garden is to have water infiltrate and drain.
Other Considerations
- Keep your rain garden at least 10 feet from your home. This keeps water from backflowing around your house and causing foundation problems.
- Rain gardens work best where there is a gentle slope to guide the water into the garden.
- Don’t put your rain garden directly over your septic system as the additional water will cause problems.
- Don’t put the rain garden under large established trees.
- Think about what you’ll see when you look out your windows.
- Consider other outdoor areas, such as eating spots and children’s play spaces.
Size
The size of the rain garden depends on the size of your overall yard as well as your budget. Most gardens are between 100 and 300 square feet.
You also need to think about the size of the rooftop, driveway, and patio, and how much water will enter the garden in an average year. In addition, you need to consider how deep the garden will be.
For a bit of perspective, know that a one-inch rainfall on a 1200 square foot roof means that about 750 gallons of water runs off into the yard. Much of this is absorbed by other garden areas and trees, but it gives you an idea of what you’re preparing for.
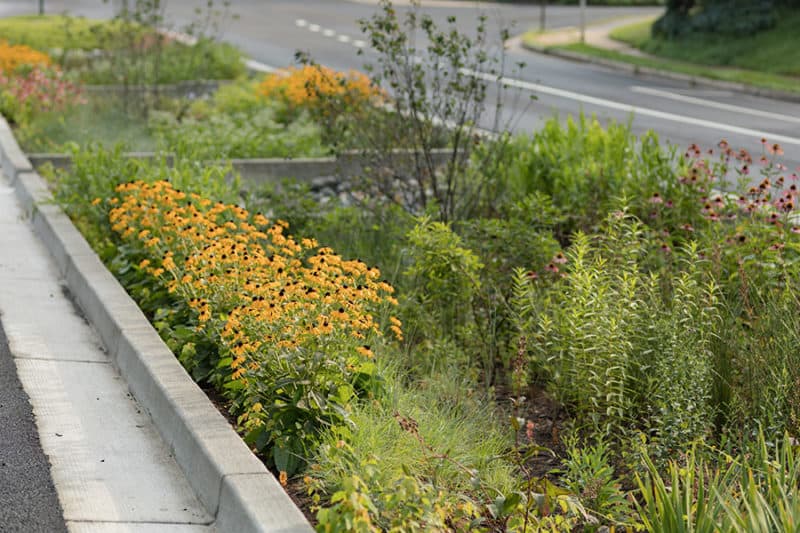
Shape
You want this to be an attractive place that blends in and lets your eye follow the contours. Crescent, teardrop, and kidney shapes are pleasant to look at and work well in a natural landscape.
To get a visual idea for your rain garden take a garden hose and layout the shape and size you think works best. Then, walk around your yard and inside your house and view that area.
Determining Slope
It’s important to find the slope of your yard. The University of Wisconsin Extension service has an excellent guide for determining slope.
Here are the steps:
- Pound in a stake where the uphill end of your rain garden will be located. Place the second stake at the downhill end. Place the stakes about 15 feet apart.
- Attach a string to the lower stake. The string should be at the top of the stake.
- Pull the string taut and tie to the upper stake.
- Measure the distance between both stakes.
- Next, measure the height on the downhill stake from the ground to the string.
- Divide the height by the length.
- Take that number and multiply it by 100 to find the slope of your yard.
⇒ Buy Here Lavender Seeds And Other Seeds You Need To Start Your Medicinal Herb Garden
Determining Depth
The slope number helps you determine the depth your rain garden should have. If the slope is greater than 12%, you need a depth of at least 12 inches. A slope between 8-12% needs approximately 8 inches of depth. A slope of 5-7% should be 6 inches deep.
Add a few inches of depth if your area doesn’t drain well. To check your drain rate, dig a small hole about 10-inches deep in the area you plan to build your garden and fill it with water. Give it an hour and see how far the water level has dropped.
If it has dropped a half-inch, your soil drains about 1/2 inch an hour, meaning it will take 24 hours to drain 12 inches. Depending on how much rain you can expect in your area, you can adjust the depth of your garden accordingly.
⇒ Is It Illegal to Harvest Rainwater in Your State?
Building a Rain Garden
Prep the Area
When you determine the right size and shape of your rain garden, spray paint or lay rope along the perimeter so that you know where to dig.
Before you begin to dig, it’s easiest if you kill any plants where the rain garden will be. Take a sheet of plastic, some old carpet or landscaping fabric and place it over the area in your design.
You also need to create a way for the water to enter. This can be an extended rain gutter downspout, a swale, or a landscaped depression.
Digging
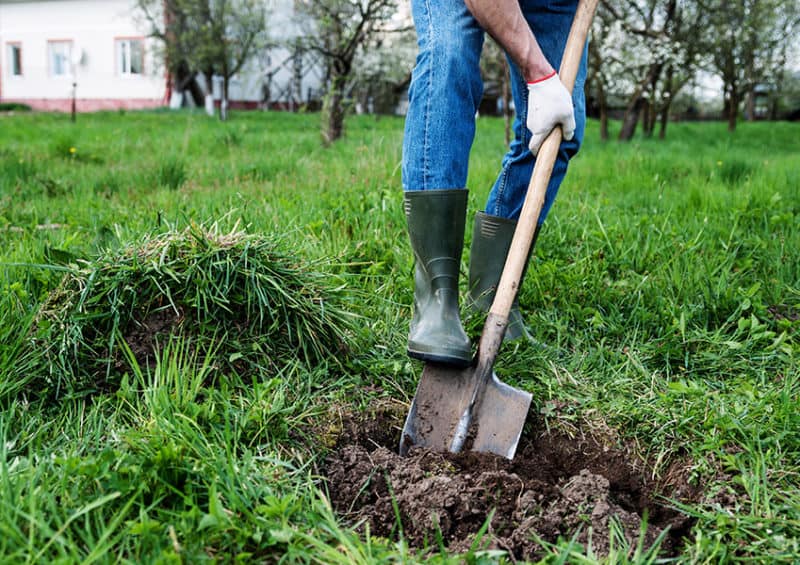
Digging a 300-foot square area to 12-inches deep is going to take two people an average of six hours according to Wisconsin extension, so be prepared if you plan to tackle the project yourself. You can always rent an excavator to save yourself some work.
The sides of the rain garden should slope up, but the bottom of the rain garden needs to be level in order to drain properly, so use a carpenter’s level to double-check.
What About All That Soil?
You have a lot of soil that comes out when you are excavating. There are numerous ways to use that earth. One way is to make berms on the downside of the garden.
A berm will help keep water from overflowing during a heavy downpour. Pile up the leftover earth on the downside of your rain garden. This helps add structure and contain water until it permeates into the subsoil.
You should pack down and plant the berm to prevent erosion of the soil. Use a pretty groundcover – something short like wild strawberries or thyme.
Fill it In
Once you’ve dug out your soil, re-fill the hole to 6-inches from the top with a mix of compost and your existing soil, or purchase a rain garden mix at a garden store. Don’t compact the soil.
Planting Your Rain Garden
The most enjoyable part of designing a rain garden is getting to pick which plants you want to incorporate into your design.
Use native plants for the best success. Native species are hardy and adapted to your area. You also want to use plants that do well with wet feet but don’t need constant moisture. Choose a variety of plant species so that you’ll have varying shapes and bloom times.
You’ll want to plant established one- to two-year-old specimens. Seeds and seedlings may not have the time to develop an adequate root hold before they are swept away by water movement.
Plant using a “clumping” technique for a natural look. Use three to five plants of the same species in a random design. Use a mix of flowering plants, grasses, herbs and rushes depending on your climate.
Place plants that can handle wet feet best towards the center and plants that prefer to be a bit drier on the perimeter. Apply a thick layer of mulch around plants to suppress weeds.
Yes, this is a rain garden but be sure to give your young plants an inch of water per week until they become established.
⇒ 800+ Medicinal Plants And Remedies That Might Be Growing Around Your House
Here are some plant ideas based on geographic location:
Prairie States
- Columbine
- Butterfly milkweed
- Blue gramma
- Little bluestem
- Mountain mint
- Golden alexander
Desert States
Though the desert states like Arizona, Nevada, and Utah might not receive a ton of rain, when they do, it can wreak havoc on the dry ground. The University of Arizona recommends plants that are drought tolerant and able to withstand occasional flooding, such as:
- Indian mallow
- Prairie acacia
- False indigo
- Desert honeysuckle
- Desert agave
- Mariposa
- Pipevine
The Mid-West
When the spring storms hit, mid-west gardeners will be glad they planted a rain garden.
- Sweet flag
- Asters
- Joe-pye weed
- Little Bluestem
- Switchgrass
- Viburnum
- Serviceberry
⇒ Buy Here A Kit That Has Everything You Need To Start Your Medicinal Herb Garden
Southern States
States like Florida particularly benefit from a rain garden during the hurricane and tornado seasons.
- Blue flag iris
- Goldenrod
- Swamp sunflower
- Milkweed
- Florida gamma grass
- Muhly grass
- Wiregrass
Northwest
The Pacific Northwest gets inundated with rain during the winter, making a rain garden almost essential.
- Oregon grape
- Serviceberry
- Mock orange
- Pacific ninebark
- Daylilies
- Tufted hair grass
- Redosier dogwood
- Beach strawberry
Adding Rock
Rock is an important part of a rain garden. The varying size and textures of the rocks help with drainage and water movement. Rocks also give your garden a natural look. Plan to add some rocky areas interspersed throughout your garden using pea gravel, river stones or something similar.
Cost of a Rain Garden
Costs vary according to how much of the work you do yourself as well as your location.
The Wisconsin Extension estimates it costs $3-5 a square foot if you do your own labor. It’ll be an estimated $10-12 per square foot if you hire a professional landscaper.
Financing Your Rain Garden
Check with your city or town administration on financing your rain garden. Many communities such as Tallahassee, Tennessee, or Detroit, Michigan, and the state of Washington all give some sort of financial aid to homeowners who disconnect and divert their downspouts.
The Bottom Line
Rain gardens are a great way to add beauty and value to your property. Not only do they help target water flow in your yard but they help the surrounding environment by keeping excess water and pollutants out of the public system. Pick hardy native plants and you’ll be enjoying your garden for years to come.
Medicinal Garden Kit is created by Dr. Nicole Apelian, who is a mother, a naturalist, a trainer in survival skills, and a Ph.D. holder. Her undergraduate education was in Biology at McGill University, and she continued her herbal studies. Her life was spent among one of the most ancient cultures of the world, the San Bushmen. For the past 20 years, Dr. Nicole has been dealing with her Multiple sclerosis by using natural remedies and medicinal plants she grows in her backyard. She has also survived 57 days all alone in the wild, which was later featured on a History TV channel. Her journey from a wheelchair to living the fullest life. Whenever she has any health issue like headache, body pain, fever, or infection, she turns towards her little backyard pharmacy.
You can get the Medicinal Garden Kit HERE!
.jpg)
Anyone can join.
Anyone can contribute.
Anyone can become informed about their world.
"United We Stand" Click Here To Create Your Personal Citizen Journalist Account Today, Be Sure To Invite Your Friends.
Humic & Fulvic Liquid Trace Mineral Complex
HerbAnomic’s Humic and Fulvic Liquid Trace Mineral Complex is a revolutionary New Humic and Fulvic Acid Complex designed to support your body at the cellular level. Our product has been thoroughly tested by an ISO/IEC Certified Lab for toxins and Heavy metals as well as for trace mineral content. We KNOW we have NO lead, arsenic, mercury, aluminum etc. in our Formula. This Humic & Fulvic Liquid Trace Mineral complex has high trace levels of naturally occurring Humic and Fulvic Acids as well as high trace levels of Zinc, Iron, Magnesium, Molybdenum, Potassium and more. There is a wide range of up to 70 trace minerals which occur naturally in our Complex at varying levels. We Choose to list the 8 substances which occur in higher trace levels on our supplement panel. We don’t claim a high number of minerals as other Humic and Fulvic Supplements do and leave you to guess which elements you’ll be getting. Order Your Humic Fulvic for Your Family by Clicking on this Link , or the Banner Below.

Our Formula is an exceptional value compared to other Humic Fulvic Minerals because...
It’s OXYGENATED
It Always Tests at 9.5+ pH
Preservative and Chemical Free
Allergen Free
Comes From a Pure, Unpolluted, Organic Source
Is an Excellent Source for Trace Minerals
Is From Whole, Prehisoric Plant Based Origin Material With Ionic Minerals and Constituents
Highly Conductive/Full of Extra Electrons
Is a Full Spectrum Complex
Our Humic and Fulvic Liquid Trace Mineral Complex has Minerals, Amino Acids, Poly Electrolytes, Phytochemicals, Polyphenols, Bioflavonoids and Trace Vitamins included with the Humic and Fulvic Acid. Our Source material is high in these constituents, where other manufacturers use inferior materials.
Try Our Humic and Fulvic Liquid Trace Mineral Complex today. Order Yours Today by Following This Link.


| Online: | |
| Visits: | 1,616,472,971 |
| Stories: | 8,189,284 |
Whistler Blowers, Insiders
